
Set Up Git and GitHub in IntelliJ IDEA and Clone a Repository
Cloning a repository means creating a full local copy of a project together with its commit history and a link back to the remote. Unlike downloading a ZIP archive, a cloned project can be refreshed with git pull and can receive your own commits with git push. This lesson covers the whole path: creating a GitHub account, installing Git, connecting the account to IntelliJ IDEA, cloning a repository, and publishing a project of your own.
Create a GitHub account
Already have an account? Skip ahead to installing Git.
1. Open github.com and click Sign up.
2. Enter your email, choose a password and a username. GitHub sends a confirmation code to that address — enter it to activate the account.
Your username becomes part of every repository URL you ever create (https://github.com/username/project.git), and recruiters do open those links. Pick something short and neutral rather than something you will want to change later.
Install Git
IntelliJ IDEA does not ship Git inside itself — it calls the Git executable installed on your system. So Git has to be installed separately.
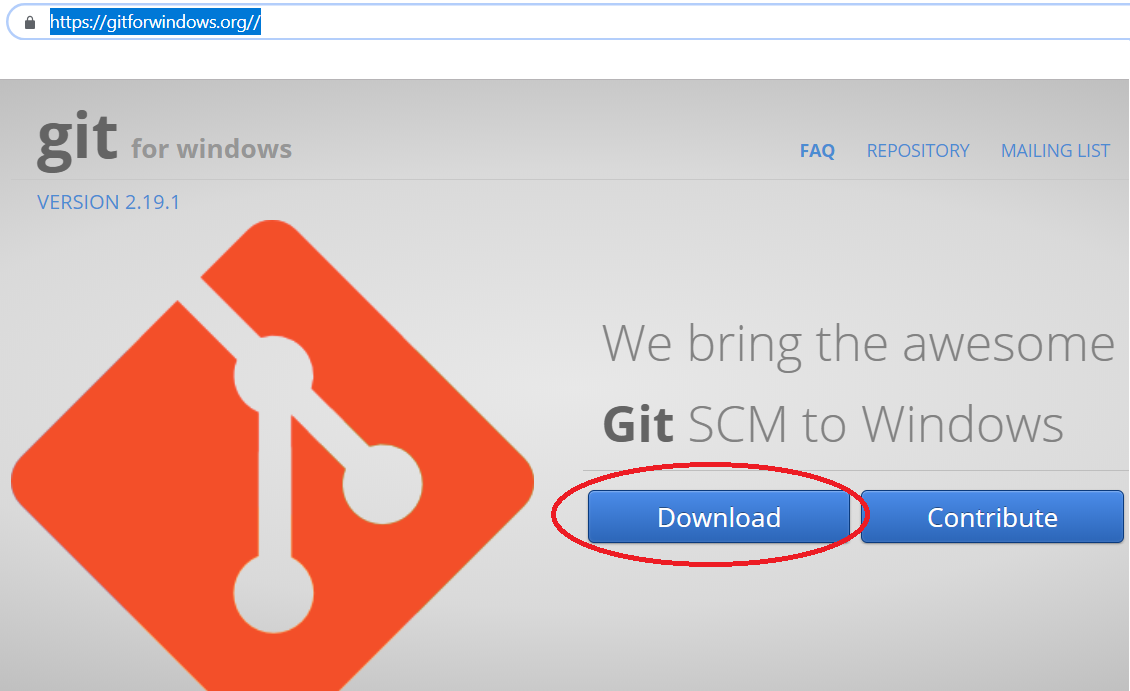
- Windows: download the installer from gitforwindows.org, run the .exe and accept the default options.
- macOS: run
brew install git, or install the Xcode Command Line Tools withxcode-select --install. - Linux:
sudo apt install giton Debian/Ubuntu,sudo dnf install giton Fedora.
When the installer finishes, open a terminal (on Windows use Git Bash or the command prompt) and check the version:
git --versionA line such as git version 2.46.0 confirms the installation. Set your name and email right away — Git writes them into every commit you make:
git config --global user.name "John Smith"
git config --global user.email "[email protected]"
Connect your GitHub account to IntelliJ IDEA
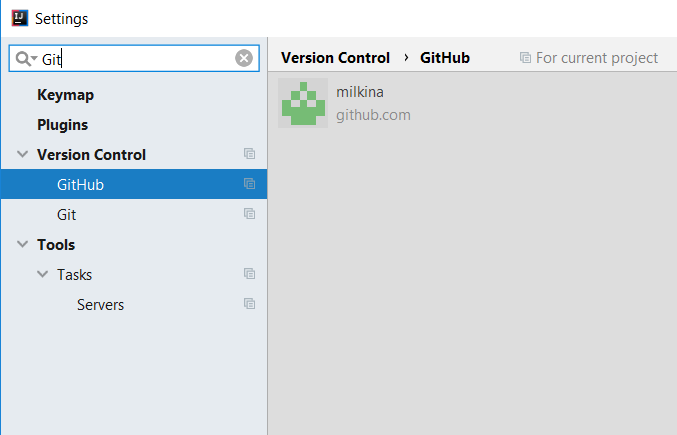
1. Open Settings (Ctrl+Alt+S, or Cmd+, on macOS) and go to Version Control. Two entries matter here: Git and GitHub.
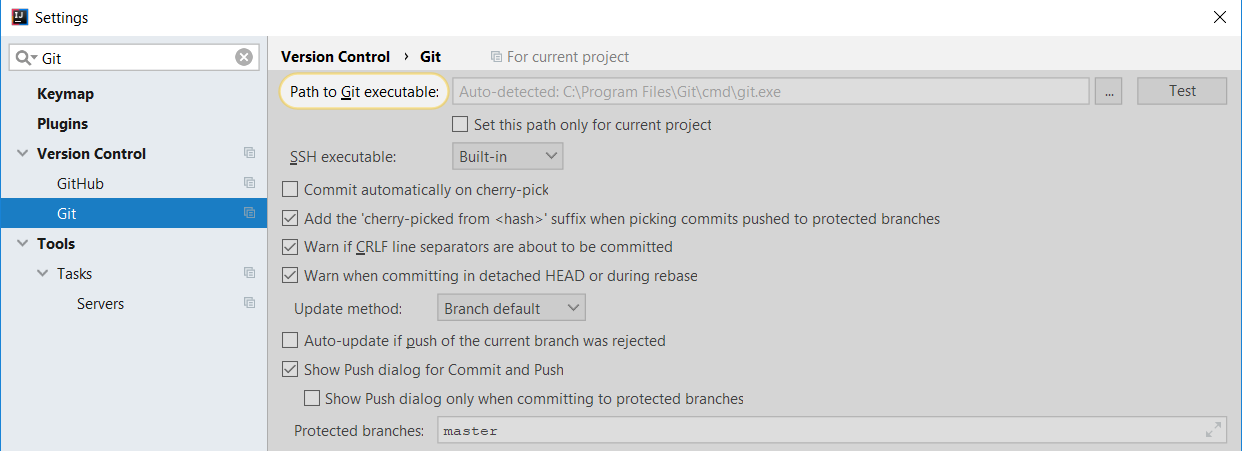
2. Open Version Control → Git and check the Path to Git executable field. IDEA usually detects it automatically; if the field is empty, point it at the binary yourself (C:\Program Files\Git\bin\git.exe on Windows, /usr/bin/git on Linux and macOS). The Test button prints the detected Git version.
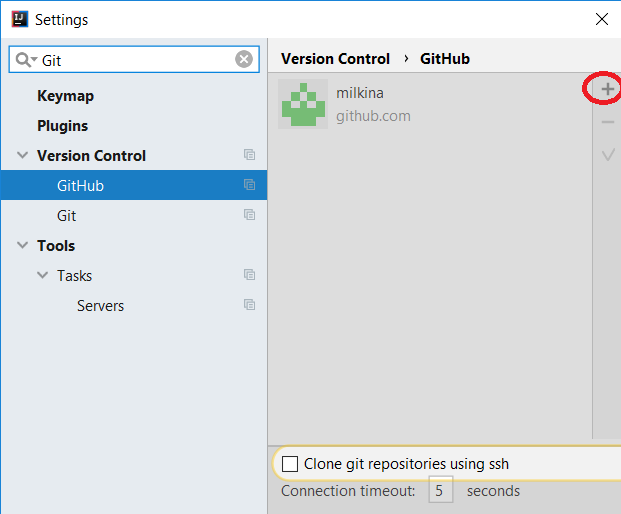
3. Open Version Control → GitHub and click + (Add account).
4. Choose how you want to sign in. Your account password is not an option any more; there are three ways in:
| Method | What happens | When to choose it |
|---|---|---|
| Log In with GitHub | A browser tab opens and you approve access for the JetBrains IDE | Fastest option for a first-time setup — nothing to copy or store |
| Log In with Token | You paste a personal access token (PAT) generated on GitHub | No browser available, a remote machine, or GitHub Enterprise |
| SSH key | No account needed in the IDE: you clone from [email protected]:user/repo.git | You already have a key configured and push often |
Tokens are created on GitHub under Settings → Developer settings → Personal access tokens. For IDE work the token needs the repo, read:org, gist and workflow scopes. GitHub shows the token once — copy it immediately.
Important
Many tutorials still tell you to type a GitHub username and password into IntelliJ IDEA. That stopped working on August 13, 2021, when GitHub removed password authentication for repository operations. The password still signs you in on the website, but not into Git — use the browser sign-in or a personal access token instead.
Clone a repository from GitHub
There are three ways to download a project from GitHub with IntelliJ IDEA. The result is identical in all three.
Option 1. From the Welcome screen
With no project open, IDEA shows the Welcome screen. Click Clone Repository (in the 2020.3–2022.x builds the button is called Get from VCS).
Option 2. From an open project
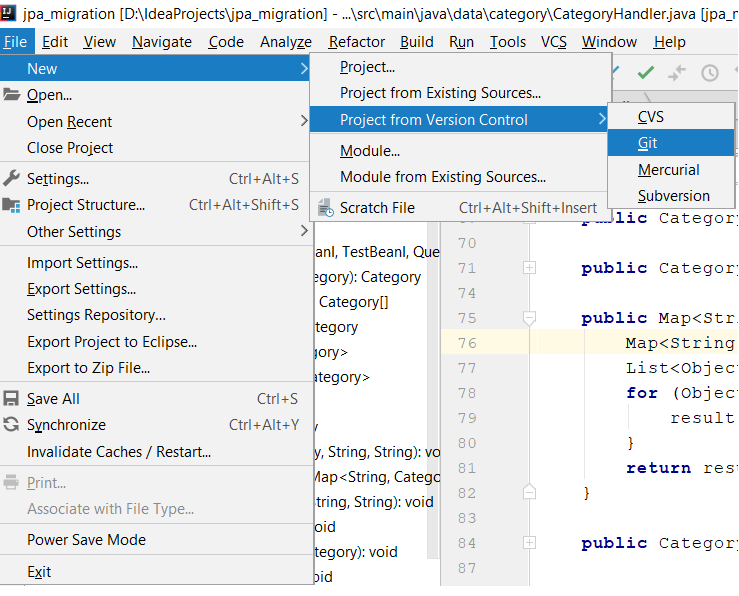
Choose File → New → Project from Version Control, or Git → Clone in the main menu.
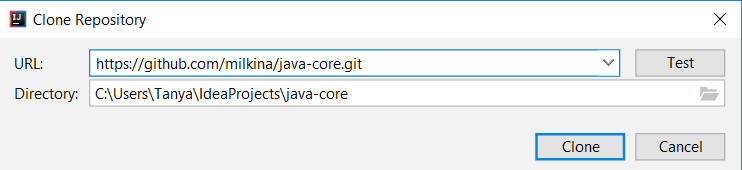
Both options open the same dialog. Paste the repository address into the URL field, for example https://github.com/milkina/java-core.git, pick a local folder in Directory, and click Clone. IDEA downloads the repository with its full commit history and opens it in a new window.
You get that address from the repository page on GitHub: the green Code button → the HTTPS tab → the copy icon.
Option 3. From the command line
One terminal command does the same job; afterwards open the folder with File → Open:
git clone https://github.com/milkina/java-core.git
cd java-core
git log --oneline -5
The last command prints the five most recent commits, which proves you got a real working copy with history rather than a plain folder of files.
Configure the project after cloning
The steps below apply only to projects without a build system — repositories that contain no pom.xml and no build.gradle. Small training projects keep their module layout inside IDE files, so after cloning you have to describe it manually.
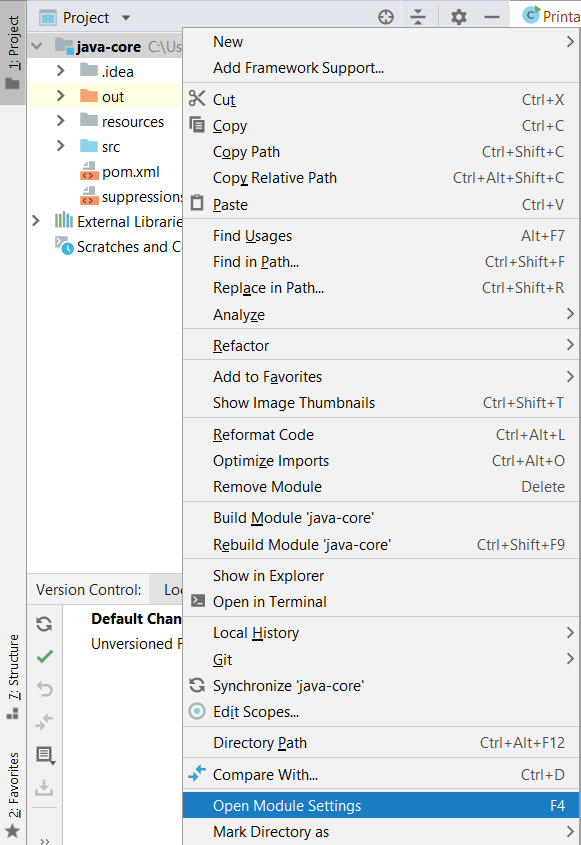
1. Select the project root in the Project tool window and press F4 (or right-click → Open Module Settings).
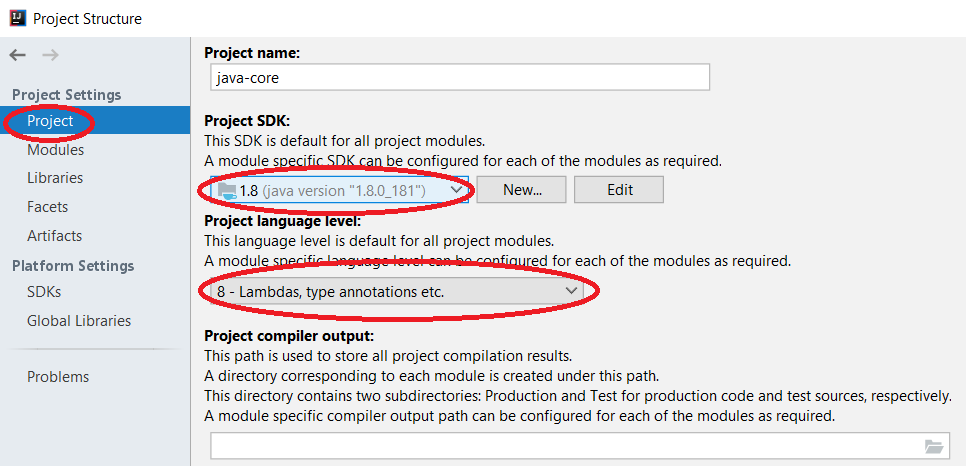
2. In the Project section check the SDK. If none is set, click Add SDK → JDK and point it at your installed JDK, then pick a matching Language level.
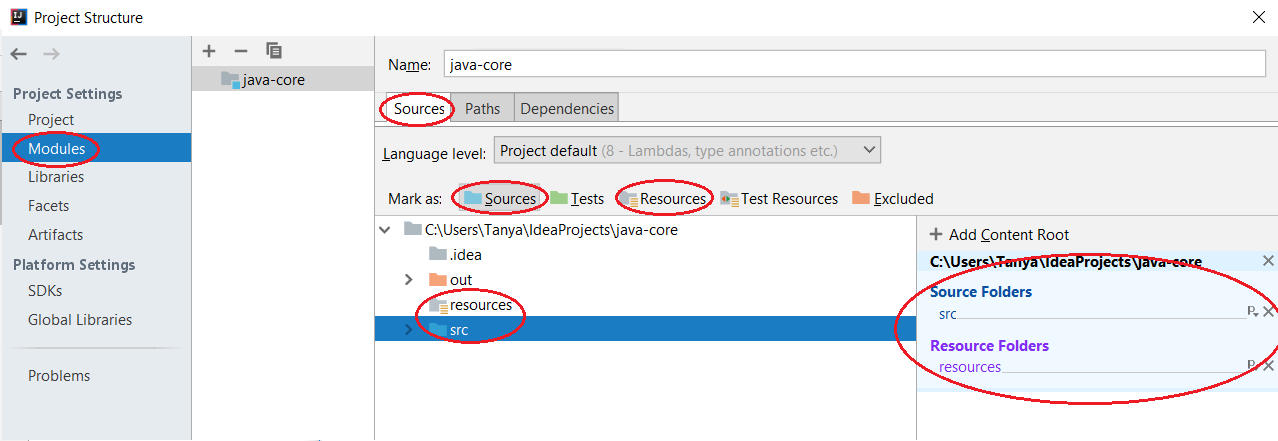
3. Open Modules → Sources and mark the src folder as Sources and resources as Resources. Skip this and IDEA treats your .java files as plain text: no code completion, no compilation.
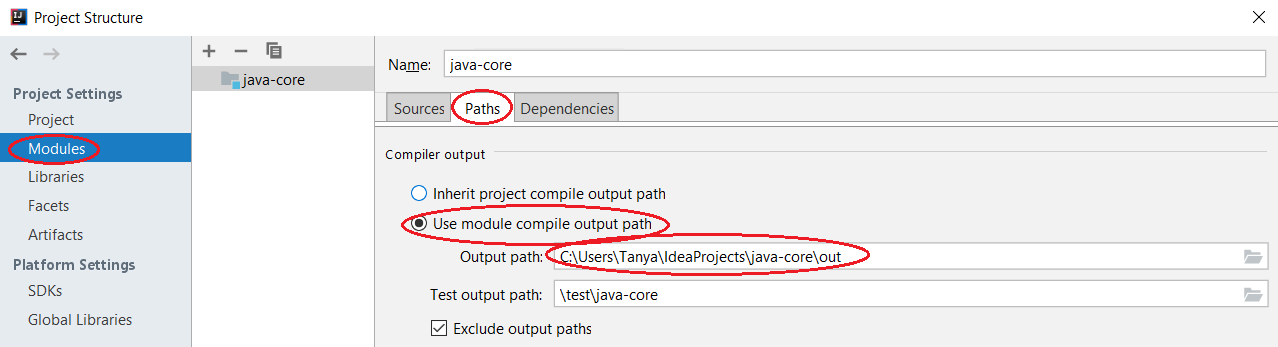
4. On the Paths tab select Use module compile output path and set the output to the project's out folder — that is where the compiled .class files will go.
Save yourself the work
If the cloned repository contains pom.xml or build.gradle, configure nothing. IDEA detects the build system, offers to import it, downloads the dependencies and marks the source folders for you. Editing Module Settings by hand in such a project is worse than useless: Maven or Gradle overwrites your changes on the next sync.
Publish your own project on GitHub
The reverse task is pushing a local project to a remote repository. IntelliJ IDEA can do it without creating the repository on the website first.
- Open the project and choose Git → GitHub → Share Project on GitHub (in older builds: VCS → Import into Version Control → Share Project on GitHub).
- Enter a repository name, tick Private if needed, and add a description.
- In the Add Files For Initial Commit dialog clear the checkboxes for
out,target,buildand.idea— compiled output and local IDE settings do not belong in a repository. - Click Add. IDEA creates the repository on GitHub, makes the first commit and pushes it.
From then on the routine is two shortcuts: Commit (Ctrl+K) and Push (Ctrl+Shift+K).
Check before you publish
Add a .gitignore in the project root with out/, target/, *.iml and .idea/. More importantly, make sure the code contains no passwords, API tokens or database connection strings. Removing a secret from Git history is far harder than never committing it — anything that reaches a public repository is treated as compromised even after you delete it.
When something goes wrong
Four messages account for most of the trouble beginners run into:
| Message | Cause | Fix |
|---|---|---|
| Support for password authentication was removed | An account password was used instead of a token | Sign in with Log In with GitHub, or create a personal access token |
| Cannot run program "git.exe" | Git is not installed, or the path is not set | Install Git, set the path in Settings → Version Control → Git, restart the IDE |
| Repository not found | A typo in the URL, or the repository is private | Copy the address with the Code button on the repository page and check your access rights |
| Permission denied (publickey) | Cloning over SSH with no key configured | Use the HTTPS address, or add an SSH key in your GitHub settings |
Conclusion
You now have a GitHub account, Git installed on your machine, and IntelliJ IDEA connected to that account. You can download somebody else's project as a real clone with full history instead of a ZIP snapshot, configure it after cloning, and publish code of your own. That is the baseline for team work — commits, branches, pull requests and merge conflicts build on exactly these steps.
Frequently asked questions
What is the difference between cloning and downloading a ZIP from GitHub?
A ZIP archive is a snapshot of the files as they are right now: no .git folder, no commit history, no link to the remote. You cannot refresh it with git pull or send changes back — you would have to download the archive again. Cloning gives you a real working copy with history, branches and push access. ZIP is fine for reading code once; anything else needs a clone.
Why does IntelliJ IDEA reject my GitHub password?
Because GitHub removed password authentication for Git operations on August 13, 2021. The password still works for signing in to the website, but not for cloning or pushing. In the IDE click Log In with GitHub and approve access in the browser, or create a personal access token under Settings → Developer settings → Personal access tokens and paste it into the Token field.
How do I clone a private or company repository?
The procedure is the same, but your account must have access to the repository and the token must carry the repo scope. If the company runs GitHub Enterprise, put the corporate address in the Server field when adding the account instead of github.com and sign in with a token — browser-based OAuth is often blocked inside a closed network.
Do I have to set the SDK and mark the src folder every time?
No. That is only needed for projects without a build system, where the module layout lives in IDE files that are usually not committed. If the repository root has a pom.xml or build.gradle, IDEA imports the project, resolves the dependencies and detects the source folders itself. Manual Module Settings edits in a Maven or Gradle project get overwritten on the next sync.
IntelliJ IDEA says Cannot run program "git.exe" — what now?
The IDE cannot find the Git executable. Check the installation with git --version in a terminal. If Git is there, open Settings → Version Control → Git, set the path to git.exe manually and press Test. A frequent cause: Git was installed after IDEA was already running, and the updated PATH only reaches the IDE after you restart it.
Comments